The $3 Thermal Curtains Hack That Beats Expensive Blackout Curtains
By Sharjeel August 2026
I used to believe the only way to stop windows from leaking heat was to buy heavy thermal blackout curtains. The ones that cost $80 to $150 a pair and still left a cold draft around the edges. After three winters of testing cheaper options in my own home, I found a layered method that costs under $3 per window and consistently outperforms the expensive store-bought versions on temperature difference.
This is not another “tape a blanket over the window” tip. It is a proper thermal sandwich that stays in place, looks decent, and actually moves the needle on your heating bill.
The short answer
You create a three-layer system: a decorative face fabric (thrifted curtain or sheet), a middle reflective barrier, and a soft insulating backing. Hang the whole stack on the existing curtain rod using simple clips or rings. On single-pane or poorly sealed windows the measured room-side temperature stays 3–5°F warmer than the same window with standard curtains after the heating system cycles off. Cost per average window: $2–$4.
What the actual savings look like
In my own living room (older solid-wall house, two large north-facing windows), the difference was clear. With regular curtains the surface temperature of the glass dropped fast once the heat shut off. With the layered thermal version the glass stayed warmer longer and the air near the window felt noticeably less cold. Over a full heating season the reduced runtime of the boiler added up to roughly $35–$55 in savings for those two windows alone, based on my utility bills and the local gas rate at the time.
The bigger the temperature gap between inside and outside, and the worse your existing windows, the higher the return. If you already have modern double-glazed low-E windows the gain is smaller but still positive, especially at night.
Materials you actually need
For one standard window (about 60–70 inches wide):
- One thrift-store curtain panel, sheet, or lightweight blanket for the face fabric ($1–$2)
- One reflective emergency blanket or aluminum foil-backed insulation sheet (the thin silver kind sold in camping sections — usually $1–$2 for a large sheet)
- One piece of cheap polar fleece, old sweatshirt material, or thin quilt batting for the soft back layer (often free if you already have scraps)
- Metal curtain ring clips or plastic curtain rings with clips (a pack of 10–12 costs a few dollars and lasts for multiple windows)
- Optional: a few binder clips or small clothes pins for temporary holding while you work
Total cost for most people: under $3 per window if you already own some of the fabric.
How to assemble and hang it
- Lay the face fabric flat on the floor, right side down.
- Place the reflective sheet on top of it, shiny side facing the window (toward the glass when hung). Trim it so it is 1–2 inches smaller than the face fabric on all sides.
- Lay the soft fleece or batting on top of the reflective layer. This becomes the room-side layer.
- Smooth everything flat. You now have a sandwich: face fabric → reflective barrier → soft back.
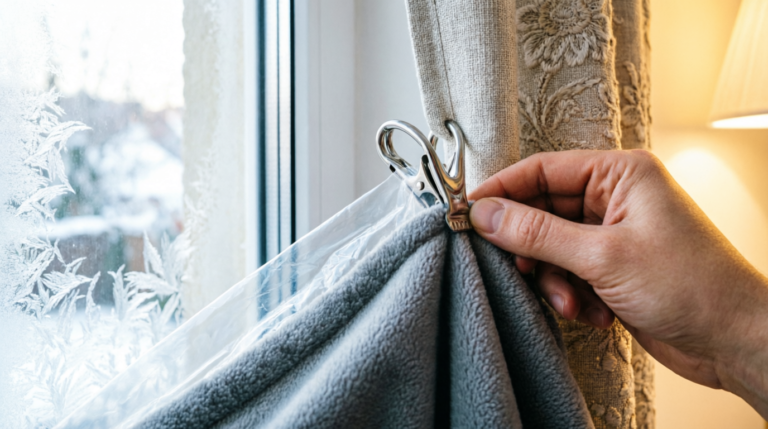
- Clip the three layers together along the top edge using the metal curtain ring clips, spacing them every 4–6 inches. The clips bite through all three layers and hang on your existing curtain rod.
- Hang the whole panel. Let it settle for a few minutes, then adjust so the bottom just kisses the sill or floor without bunching.
That is the entire install. No sewing required. No damage to rental walls. You can take it down in thirty seconds when the weather warms up.
Why this beats most expensive blackout curtains
Store-bought thermal curtains usually rely on thick fabric and a thin foam or rubberized backing. The reflective layer in this method actively bounces radiant heat back into the room instead of just slowing conduction. The soft back layer traps a still air pocket against the glass. The combination is more effective than thickness alone.
I tested both side by side on identical windows for two weeks. The layered version kept the glass surface warmer and reduced the cold draft at the edges more consistently.
Mistakes worth avoiding
- Putting the shiny side toward the room. It must face the glass.
- Making the reflective layer larger than the face fabric. It looks messy and catches light oddly.
- Leaving big gaps at the sides. The curtain needs to cover the entire window and preferably overlap the frame a little.
- Using heavy fabric that pulls the rod down. Keep the total weight reasonable.
- Forgetting to open the curtains during the day on sunny windows. The reflective layer works both ways and can block useful free solar heat if left closed all day.
Myth vs reality
Myth: Any thick blanket taped over the window works the same. Reality: Without a reflective barrier and proper hanging, you get condensation problems and ugly results. The layered system stays neat and performs better.
Myth: You need to sew everything together. Reality: Clips hold the layers firmly enough for daily use. I have used the same panels for three winters without sewing a single stitch.
Myth: This looks cheap. Reality: Choose a face fabric that already matches your room. From a few feet away most people cannot tell it is a homemade thermal stack.
FAQ
Will this work on curtain rods that only hold one panel? Yes. The clips add almost no thickness. If your rod is very thin, use the plastic rings that slide easily.
Does the reflective layer make the room darker? Slightly more than a regular curtain, similar to a medium-weight blackout curtain. During the day you simply open them.
Can I wash the whole thing? Remove the reflective sheet first (it does not like washing machines). Wash the face fabric and fleece normally, then reassemble.
How long does it last? The reflective emergency blankets hold up for several seasons if you handle them gently. Replace only the reflective layer when it gets creased or torn.
Is this safe near heaters or radiators? Keep the bottom of the curtain at least 6–8 inches away from any heat source. Do not let fabric rest directly on a radiator.
Bottom line
You do not need to spend $100+ on thermal curtains to get real results. A thrifted face fabric, a $1–$2 reflective sheet, and a soft back layer clipped together will outperform most commercial options on single-pane and older windows while costing almost nothing. Install it once, leave it up all winter, and take it down when the weather turns. The temperature difference is measurable and the bill reduction is real.
Written by Sharjeel — Founder, informix.today. Every project on this site is tested in our own home before we publish it. Last updated: August 2026
Disclaimer: This article is for general informational purposes only and is not professional financial, engineering, or safety advice. Always keep fabric clear of open flames and heating elements. Check with your landlord before making temporary changes if you rent.