How to Make a No-Stitch Thermal Curtain Liner Using Thrifted Fleece Blankets
Stand near a window on a cold night and you can practically feel money leaving the house. It’s not just a feeling — window glass conducts heat efficiently, and older single-pane or worn double-pane windows can account for up to 30% of a home’s total heat loss.
Buying commercial thermal curtains is the obvious answer, but a single good insulated panel can run $50–$100. Treat a house full of drafty windows and that adds up fast.
You don’t need to spend that much, and you don’t need to know how to sew. A thrift-store fleece blanket and a basic plastic drop cloth can become a genuinely effective, fully customizable thermal curtain liner. Here’s exactly how.
The quick version
Skip the $100 thermal drapes. Pick up a $3–$6 polar fleece blanket from a thrift store and a couple-dollar plastic drop cloth. Layer them behind your existing curtains and clip them on with cheap metal curtain rings. The fleece traps a layer of still, warm air; the plastic behind it stops that warm indoor air from reaching the cold glass and condensing.
Why fleece, and why no stitching is needed
Most DIY thermal curtain guides call for heavy canvas, cotton batting, or wool — all of which fray the moment you cut them, forcing you into hemming or fabric glue. Polar fleece is different: it doesn’t fray when cut. Take scissors to it and the edge stays clean, no finishing required.
It’s also lightweight while still trapping air effectively, and being synthetic polyester, it doesn’t absorb moisture — which matters a lot here, for reasons below.
The layering, from the window outward, looks like this:
  Room side (warm, humid air)
       │
       ▼
┌────────────────────────┐  ← Your existing decorative curtain
├────────────────────────┤  ← Fleece blanket (traps warm air)
├────────────────────────┤  ← Plastic vapor barrier (blocks moisture)
└────────────────────────┘
       ▲
       │
  Window side (cold glass)
The condensation risk most guides skip
Here’s something a lot of home-improvement advice leaves out: hanging a bare, heavy blanket over a cold window is a good way to grow mould.
When warm, humid room air passes through a breathable fabric and meets freezing glass, it hits its dew point and condenses on contact. If a cotton or wool blanket is sitting against that glass, it soaks up the moisture, stays damp for days, and can eventually rot a wooden frame or grow black mould underneath it.
Commercial thermal curtains solve this with a built-in vapor barrier. The DIY version does the same job with a plain sheet of clear plastic drop cloth, placed behind the fleece so warm, moist air never actually touches the cold glass.
Why this actually works: R-value, briefly
Insulating materials are rated by R-value — resistance to heat flow. A thin decorative curtain sits around R-1. Layer it properly with fleece and a sealed plastic barrier and you can push that to somewhere between R-3 and R-5.
Heat loss rate (the U-factor) is the mathematical inverse of R-value (U = 1/R), so going from R-1 to R-4 cuts conductive heat loss through that window by roughly 75% — which can translate to a noticeable double-digit percentage reduction in a home’s overall heating loss.
Building it, step by step
What you’ll need:
- One thrifted polar fleece blanket — look for a thick, tightly woven one; twin or queen size usually runs $3–$6 secondhand
- One clear plastic drop cloth (2–4 mil polyethylene works fine)
- A pack of metal curtain clip rings (rings with small alligator clips attached)
- Measuring tape and sharp scissors
1. Measure the window. Measure top to bottom and side to side. For the best insulation, the liner should extend at least 5 inches above the frame and reach down to the floor or windowsill.
2. Cut the fleece. Lay the blanket flat, mark your measurements, and cut with sharp scissors. No extra fabric needed for hemming — that’s the whole point of using fleece.
3. Cut the plastic barrier. Trim the plastic sheet to about 1 inch smaller than the fleece panel on every side, so it stays hidden once everything is hung.
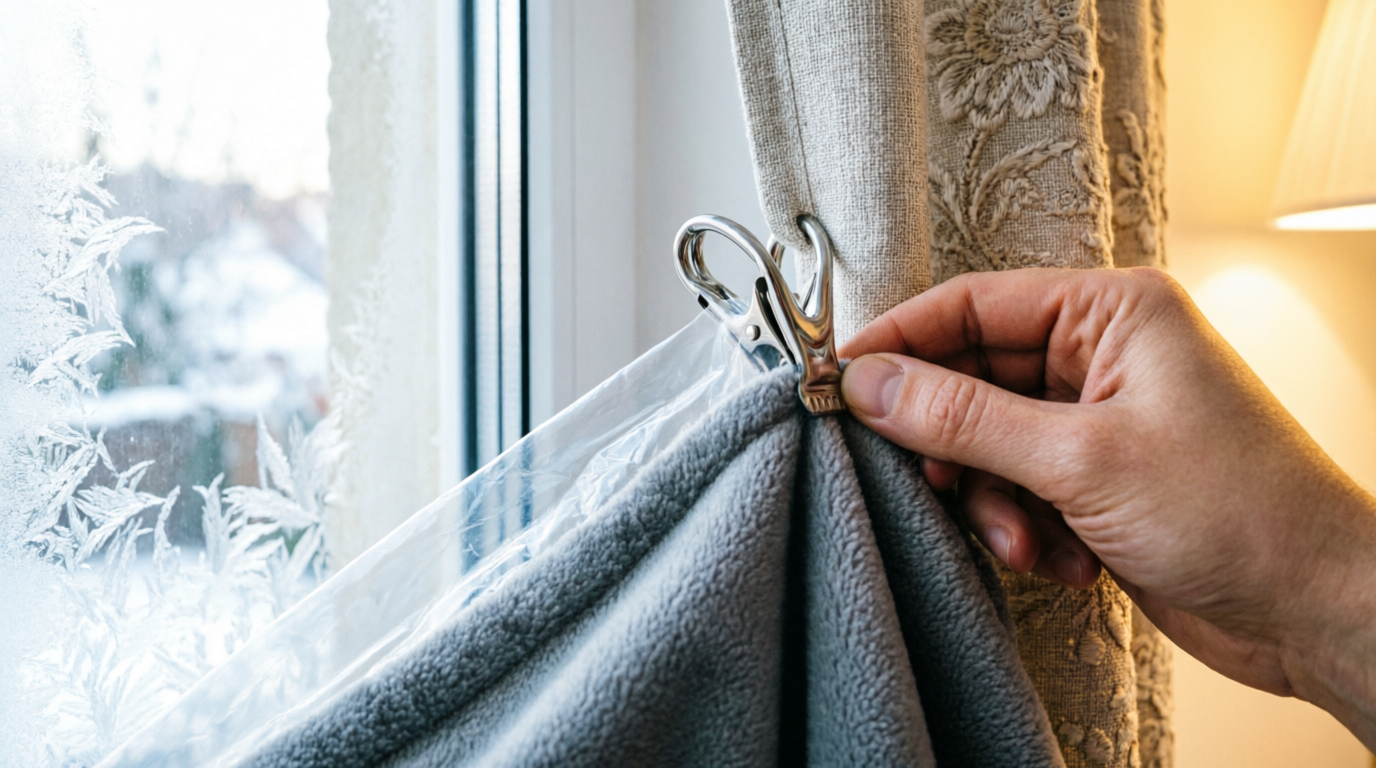
4. Layer and clip. Lay your existing curtain face-down on a clean floor. Place the fleece directly on top of it, then the plastic sheet on top of the fleece (this becomes the side facing the window). Starting at one corner, pinch all three layers together and clip with a metal curtain ring. Space clips every 4–6 inches along the top edge.
Show Image
5. Hang it. Slide the rings onto your curtain rod. The fleece and plastic sit invisibly behind the decorative curtain, quietly blocking drafts and holding heat in.
Living with it day to day
Want daylight during the day? Since the liner clips directly onto your existing curtain, it slides open just as easily. On sunny winter days, open it up to take advantage of free solar heat, then close it tight as soon as the sun goes down.
Managing residual condensation. Even with a good vapor barrier, a small amount of condensation can still form on the glass itself. Open the curtains for at least a couple of hours a day to let that area breathe.
Cleaning it. Unlike a sewn-in liner, this clips apart easily. Unclip it, remove the plastic sheet, and toss the fleece in the wash on a cold, gentle cycle whenever it needs it.
Myth vs. reality
Myth: Any heavy thrift-store blanket — wool, thick cotton knit — works just as well. Woven natural-fiber blankets fray apart the moment you cut them without hemming, and worse, they absorb condensation like a sponge, setting up exactly the mould problem described earlier. Synthetic polar fleece avoids both issues.
Myth: A thick liner alone will fully draft-proof a window. It blocks conductive heat loss, but it won’t stop air moving through physical gaps in the frame. If you’re dealing with an actual draft, pair this with something like our bubble wrap window insulation trick for a more complete fix.
Going further: sealing the edges with magnets
To push performance closer to R-5, it helps to stop what’s sometimes called the “gravity loop” — warm room air cools against the curtain, sinks, and slips out the bottom, which pulls in more warm air at the top and keeps a slow, cold current circulating in the room.
A physical edge seal stops this:
- Get a roll of self-adhesive magnetic tape.
- Stick one strip vertically along the window’s wooden trim.
- Stick the matching strip along the outer edge of the fleece liner.
When you close the curtain at night, the two strips snap together, sealing the edge and shutting down that convective loop almost completely.
FAQ
Can I use an emergency Mylar blanket instead of clear plastic? You can, but it’s not ideal — Mylar is crinkly and loud, so every draft or bump against the curtain sounds like a bag of chips. A clear plastic drop cloth is silent and holds up better over time.
Will this make the room completely dark? Yes. Layering a dense fleece blanket and a solid plastic sheet behind a curtain functions as an effective blackout setup — great for bedrooms, less great if you want ambient daylight without opening it.
How do I check if my window frame is already leaking air before I bother with this? Run a simple candle test: light a candle and move it slowly along the edges of the closed window frame on a windy day. If the flame flickers or bends sideways, there’s a physical air leak worth sealing with caulk or weatherstripping first — similarly to how the dollar bill fridge door test checks for a different kind of seal failure.
How much could this actually save? Depending on climate and how many windows you treat, cutting major window heat loss this way can shave a meaningful amount off a monthly heating bill, while a single panel typically costs under $10 to build — often paying for itself within a few weeks.
Does it help in summer too? Yes. Keep the curtains closed during the hottest part of the day; the light-colored fleece or plastic backing reflects a good portion of incoming solar heat back outside, easing the load on your AC.
Bottom line
This doesn’t require any special skill or a renovation budget — just a thrifted blanket, a plastic sheet, and an understanding of how heat actually moves through a window. It’s a weekend project that keeps your money inside your house where it belongs.
Written by Sharjeel — Founder, informix.today Last updated: July 2026
Disclaimer: This article is for general informational purposes only and isn’t professional engineering or financial advice. Test any DIY method safely.