How to Build a Self-Watering Window Planter From Recycled Plastic Bottles
Stop killing your indoor herbs! Learn how to build a simple self-watering planter using recycled plastic bottles. Save money and grow productive food in tiny spaces.
Quick Start: DIY Self-Watering Planter
- What: A smart, low-maintenance planter made from a recycled plastic bottle.
- Who: Best for busy households and small-space herb gardeners.
- Problem: Tired of forgetting to water or killing plants while away?
- Takeaway: Capillary action ensures your plants get the exact amount of water they need.
- Action: Grab a 2-liter bottle, a strip of cotton fabric, and potting soil to start today.
- Importance: It saves money on gear and prevents plant loss through consistent hydration.
If you have ever come home to a drooping, sad-looking basil plant after a long day, you know the struggle of keeping container plants hydrated. In small apartment spaces, soil dries out incredibly fast, and finding the time to water every single pot daily feels like a full-time job.
A self-watering planter is the ultimate solution. By using a recycled plastic bottle, you can create a system that lets the plant decide how much water it needs through simple physics.
The Cost-Saving Reality
Buying commercial self-watering systems can cost $20 to $50 per pot. That defeats the purpose of growing your own food to save money. By repurposing a 2-liter soda or water bottle, you spend exactly zero dollars. Beyond the hardware, the real savings come from plant longevity. Consistent moisture means fewer dead plants, which saves you the recurring cost of replacing herbs and seeds every few weeks.
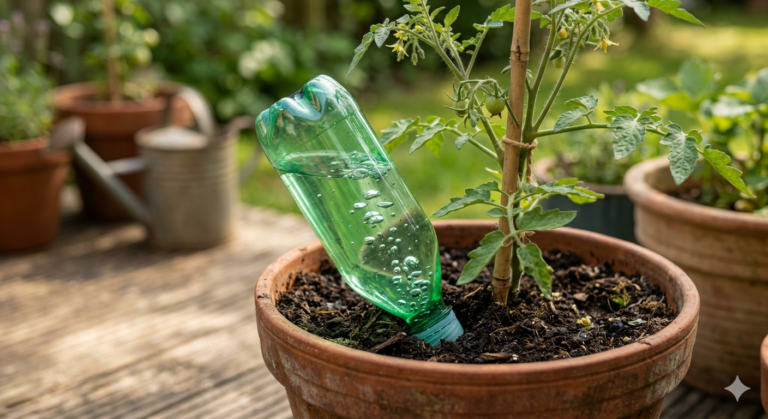
How It Works: The Physics of the Wick
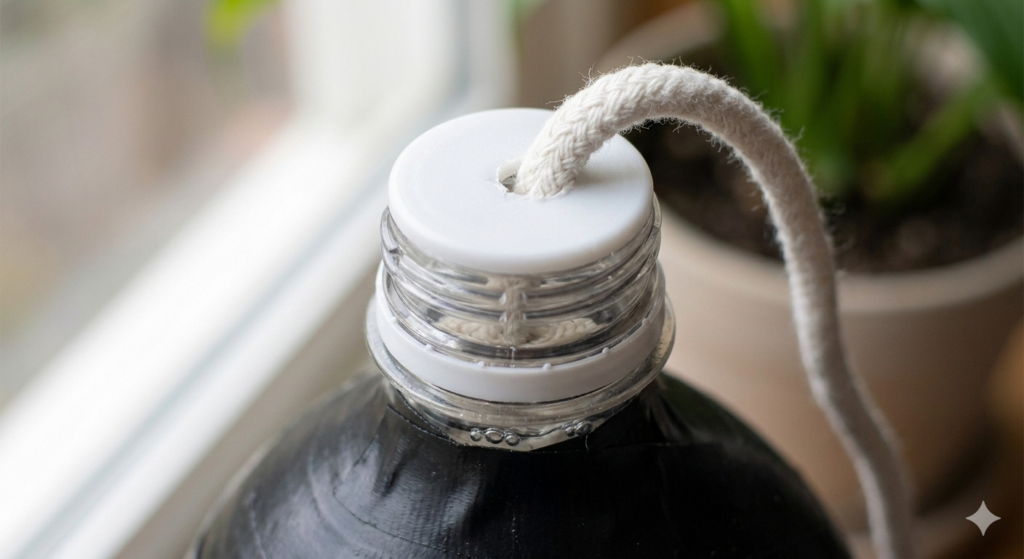
The core of this system is the wick. By placing a strip of absorbent fabric between the soil (the plant) and the water reservoir (the base), you utilize capillary action. The soil pulls moisture up from the reservoir as it dries out, meaning you only need to refill the bottle once every week or two, depending on the plant species.
Step-by-Step: Building Your System
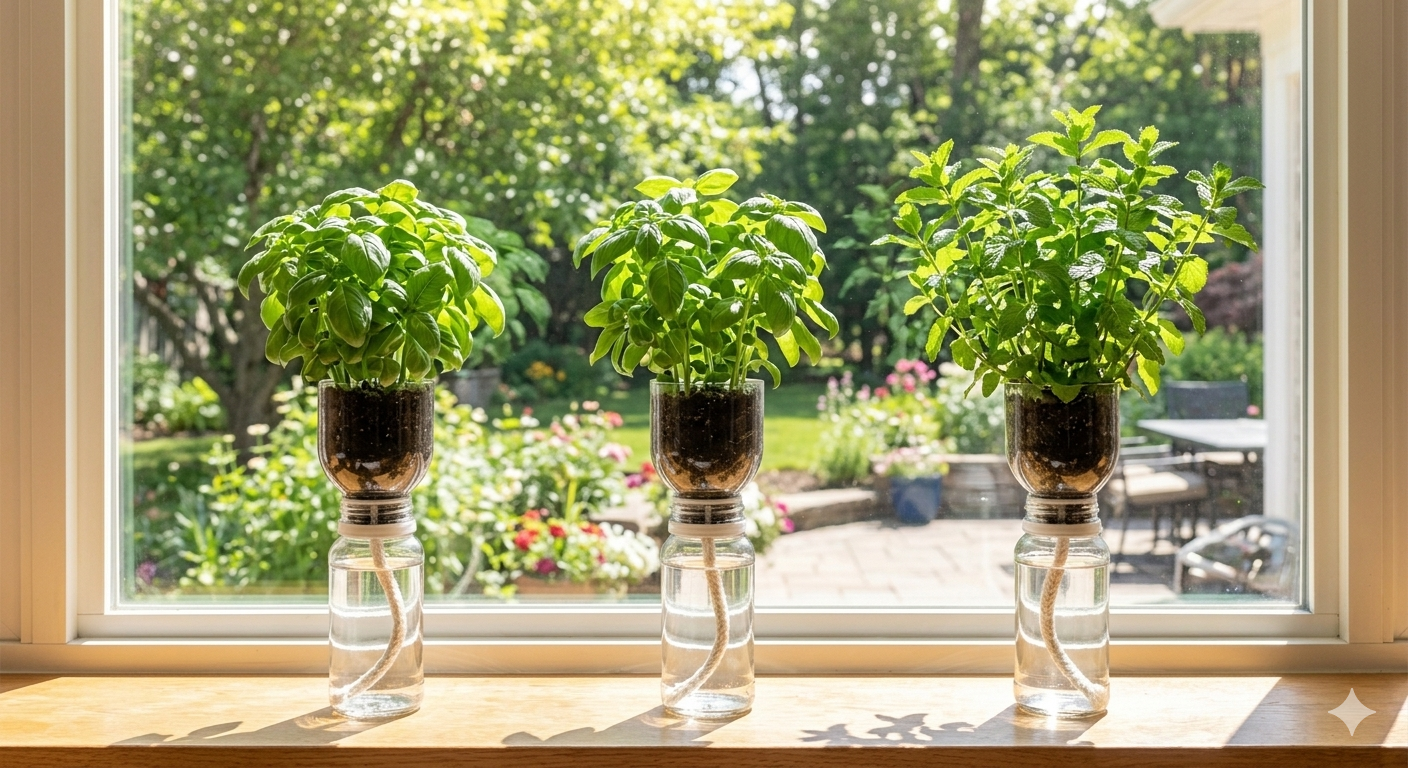
- Prep the Bottle: Cut a clean 2-liter bottle in half.
- The Wick: Cut a 6-inch strip of 100% cotton fabric (an old T-shirt works perfectly).
- Assembly: Thread the fabric through the bottle cap (you’ll need to drill a hole in the cap first). Ensure half the fabric is inside the soil portion and half hangs down into the water.
- Fill: Place the top half of the bottle (cap side down) into the bottom half. Fill the top with high-quality potting mix, and fill the bottom with water.
- Plant: Add your seeds or young herb starts.
Common Mistakes to Avoid
- Choosing the wrong fabric: Synthetic fabrics (like polyester) don’t “wick” water effectively. Stick to cotton or natural fibers.
- Overfilling the reservoir: Never let the soil touch the water directly. There must be an air gap between the neck of the bottle and the water level, otherwise, the roots will drown and rot.
- Ignoring the algae: Clear plastic lets light in, which grows algae. Once your system is built, wrap the bottom reservoir in masking tape, fabric, or paint it to keep it dark.
Myth vs. Reality
| Myth | Reality |
| “Self-watering planters are for lazy gardeners.” | They are for efficient gardeners. Consistency is the secret to healthy herbs. |
| “You don’t need to check it ever.” | You still need to monitor the water level. Letting it run bone-dry can cause the wick to lose its “priming” ability. |
| “It works for all plants.” | It is perfect for moisture-loving plants like basil or lettuce, but will kill succulents or lavender. |
Advanced Workflow: Scaling for Multiple Plants
If you want to take this to an expert level, create a Linked Reservoir. By using small vinyl tubing to connect the bases of three or four of these bottle planters, you create one centralized reservoir. You can refill the entire “system” by pouring water into just one of the bottles. This is a game-changer for a small window shelf, allowing you to manage five or six plants at once with zero effort.
Frequently Asked Questions
1. Which plants thrive in this system?
Basil, mint, lettuce, parsley, and spinach love this setup. Avoid rosemary, thyme, and succulents.
2. How do I prevent mosquito breeding?
Ensure the bottom reservoir is completely enclosed. If there is a gap, cover it with a bit of mesh or tape.
3. Does the fabric need replacing?
It will eventually get clogged with minerals from the water. If you notice the soil isn’t staying moist, simply pull the old wick out and replace it.
4. Can I use this for larger vegetables?
No. This is best for herbs and leafy greens. Larger plants like tomatoes need a five-gallon bucket balcony setup for root space.
5. How do I know if I’ve overwatered?
If the leaves turn yellow, the soil is likely too saturated. Reduce the amount of water in the reservoir or add a few extra drainage holes near the top of the reservoir section.
Written by Sharjeel — Founder, informix.today
Last Updated: May 2026
Disclaimer: This article is for informational purposes only and does not constitute professional financial or legal advice. Always test DIY hacks safely.